This is not a guide by any means. It is just my experience, from the initial hardware setup to the installation of Proxmox and configuration of various software applications in this old computer I had lying around. I will also share some of the challenges I encountered and how I overcame them.
If you are new to Proxmox, it is a powerful, open-source virtualization platform that allows you to run multiple virtual machines and containers on a single host. It is based on Debian, and it uses KVM (Kernel-based Virtual Machine) for virtualization and LXC (Linux Containers) for lightweight virtualization.
Curiosity sparked
The idea of setting up a home lab first came up from watching Mental Outlaw’s and Wolfgang’s Channel on YouTube. I was sold and very interested in having all my personal data, photos, videos, backups… safe in a local, self-hosted environment, away from big corp and the cloud (or as someone might say, some other guy’s computer).
I researched about local backups, NASes, home servers and found TrueNAS. The deeper I went into the rabbit hole, the more I learned about data storage, hard drive configurations such as RAIDZ, filesystems (ZFS), and the importance of backups. I ended up buying a new 2TB hard drive to combine with an existing 2TB I already had, and I set up a RAID-Z1 single parity configuration using TrueNAS. This meant that I would get only 2TB (out of 4TB total) of usable storage, but would be able to restore all my data in the case of a hard drive failure.
After installing TrueNAS and configuring the storage pool, I also set up a few jails to run some services like Nextcloud for general file storage, like Google Drive and Immich for photos and videos, similar to Google Photos. Jails are a lightweight virtualization method in FreeBSD systems that allows you to run applications in a separate environment, similar to containers, but with a different implementation.
Why did I stop using TrueNAS?
Everything was installed and running. However when I tried Nextcloud and Immich to store media in them, I realized the experience would be frustrating. Files uploaded very slowly, and the web interface was sluggish. I also noticed that the CPU usage was very high. You can’t expect much from a 2-core Pentium G620 CPU with 6GB of DDR3 RAM.
Hard drives are also expensive, and I didn’t want to spend much right now. So I gave up on the idea of storing media in my home server for now. This was a bummer, because I was running out of space on Google Photos and I wanted to have a local backup of my photos and videos. I ended up turning on file compression in the Photos settings and put the media backup idea on hold.
I didn’t do much with the server after that. Another pain point I had with it was that the PSU was very loud. It was still the stock PSU that came with the PC a decade ago.
Low power PSUs for home servers
Some weeks later, Wolfgang from Wolfgang’s Channel had posted a new video that interested me a lot, describing a great list he put together about PSU analyses from Cybenetics. The focus was on PSUs that have a high energy efficiency rating for low power consumption, perfect for a home lab setup that sits idle most of the time. You can check the list yourself here.
I understand that it takes a very long time, if at all, to recover the cost of a more expensive PSU with the energy savings it brings. But I was interested in the idea of having a silent PSU that would also consume less power. I also wanted to have a more reliable PSU, as the stock one was already a decade old.
I then went ahead and bought a Cooler Master MWE 650 V2 80 Plus Bronze. I’m sure I’ll be able to use it in future builds as well, when I eventually upgrade the server hardware to store media and run more services.
When I booted up the system, I was pleasantly surprised to hear no fan noises whatsoever. The PSU was completely silent.
Enter Proxmox
With experience with TrueNAS and jails, I was interested in learning more about virtualization. I had heard about Proxmox before, and I wanted to try it out. I also now understood that my hardware was not able to handle CPU intensive tasks.
I began by downloading Proxmox VE ISO and creating a bootable USB stick with Rufus. I then booted the system from the USB stick and installed Proxmox VE. Now what?
I’m really glad I found Proxmox VE Helper Scripts. It made my beginner experience with Proxmox orders of magnitude better. To add a new container, simply choose a service from the ones available and run the script. I started with qBittorrent.
However, before going forward, I had to setup the hard drives to store higher volumes of data. Proxmox offers an advanced web UI that allows the user to configure and manage everything. I wasn’t worried about parity or redundancy, as I would not store important personal data right now. So I just formatted the drives as ext4 and created a single partition for each drive.
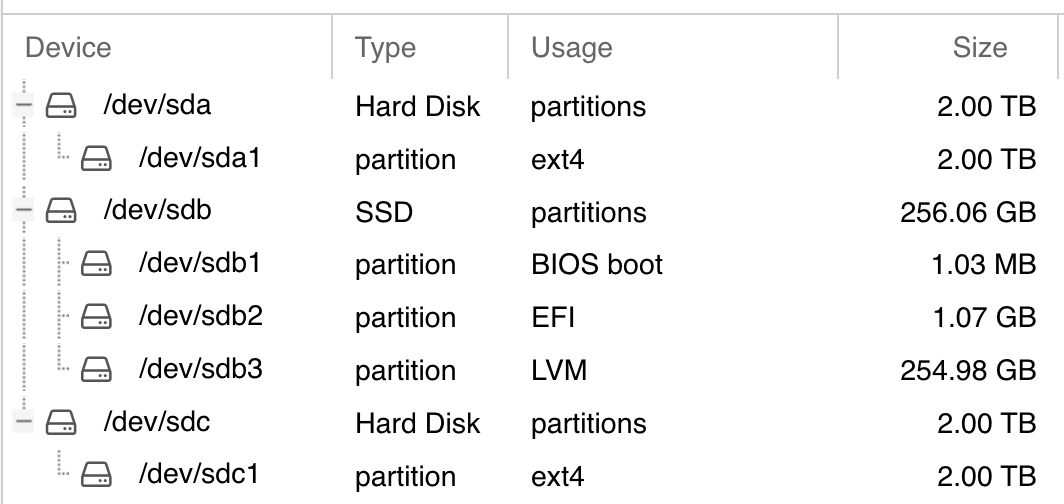
I created a new volume for the qBittorrent Linux Container of 100GB in the sdc hard drive. It is simple to expand the volume later if needed.

It was just a matter of configuring qBittorrent to store the downloaded files in /mnt/torrents and everything would be stored in the sdc hard drive.
Learning and researching everything to reach this far was a huge success for me. I was hooked and wanted to try installing more services.
Services overview
I’ll briefly go over the services I have installed and configured in Proxmox in this chapter.
Blocky DNS Proxy
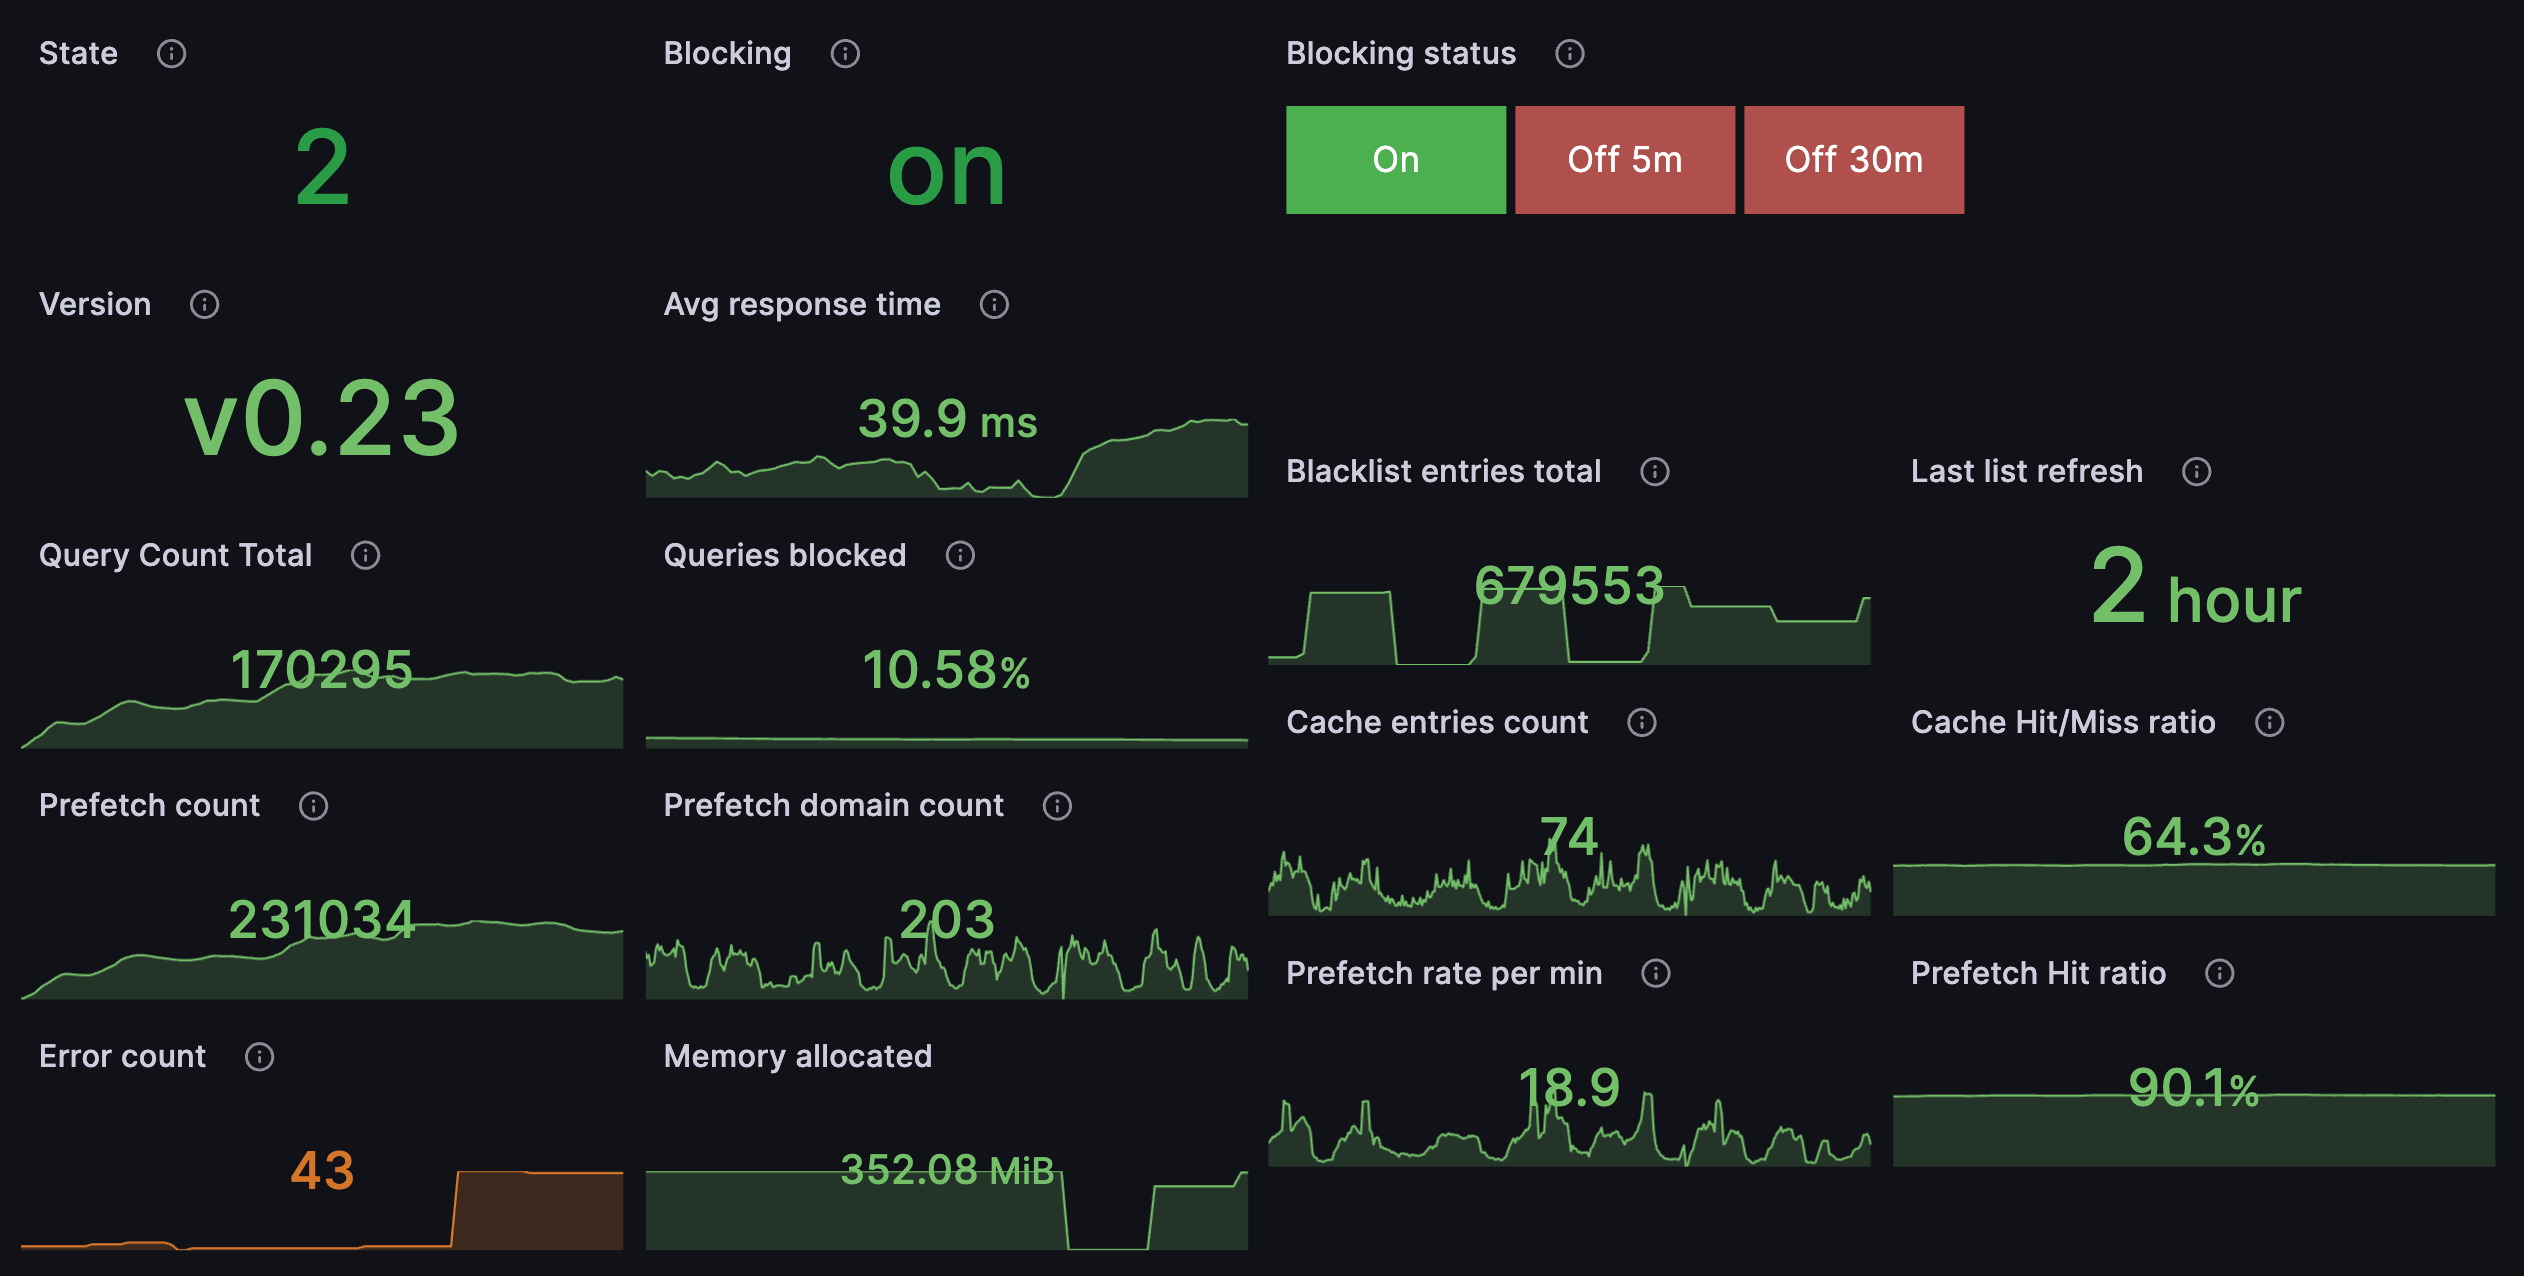
Blocky is a DNS proxy and ad-blocker for the local network written in Go. If you have ever used or heard of Pi-hole, it is similar to that. It blocks ads, malware, and dangerous websites across the entire Wi-Fi network. The results have been impressive, significantly reducing unwanted content not only for myself, but for everyone in the network.
Here are some anonymous metrics Blocky exports through Prometheus and are displayed through Grafana (last 7 days):
The most powerful combination I’ve found is using Blocky with Tailscale. I was dumbfounded when it worked, and I was able to use Blocky to block ads on my phone, even when I was not connected to my home Wi-Fi. Tailscale is a VPN that makes it easy to connect devices to your home network, and it is free for personal use. It allows you to configure a DNS server for the whole VPN, and I set it to my Blocky server.
Nginx Proxy Manager, DuckDNS and Let’s Encrypt SSL certificates
Nginx Proxy Manager is a reverse proxy that makes it easy to manage and secure web applications. DuckDNS is a free dynamic DNS service that allows you to point a subdomain to your home network. That’s right, you can have a domain name for local IPs. How crazy is that? And Let’s Encrypt is a free, automated, and open certificate authority that provides SSL certificates for your web applications.
Now combine all three and you get domain names and secure HTTPS to all services running in your home network. No more accessing services through IP addresses and HTTP.
DuckDNS
Here is a screenshot of the DuckDNS configuration. DuckDNS gives you a token to later setup SSL certificates with Let’s Encrypt. In my case, fell was already taken, so I went with fells as the subdomain. It is pointing to the Homer dashboard IP address, which I will talk about later on.

Nginx Proxy Manager
To configure your services domains, you need to create new proxy hosts and assign them to subdomains. Here is an example of a few of my services:
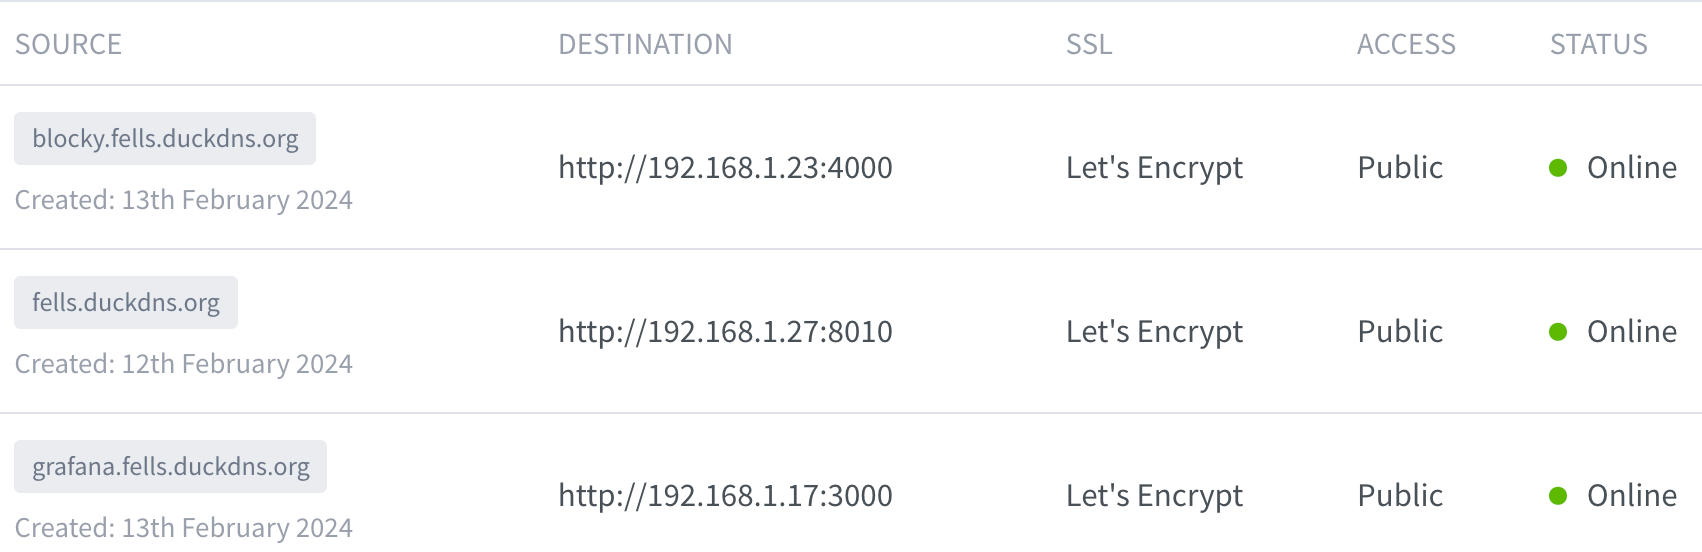
The IP address then becomes accessible through the subdomain.
Let’s Encrypt
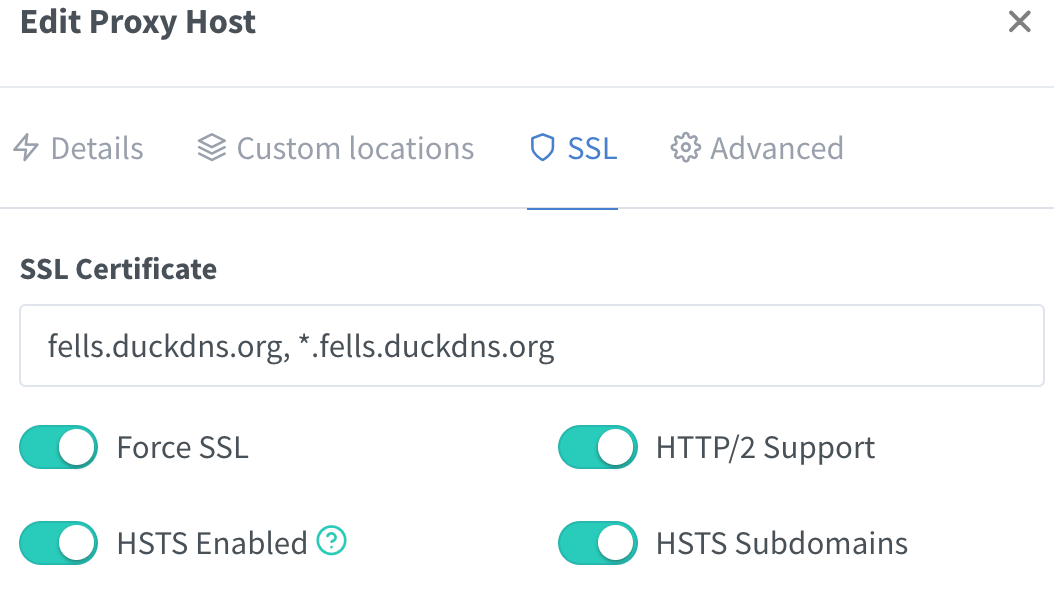
Now to add SSL certificates to your services and upgrade the connection to HTTPS, it is as simple as finding the SSL section on Nginx Proxy Manager. There, Let’s Encrypt and DuckDNS have a nice integration. Just setup the subdomains and make sure to add the token DuckDNS gives you.
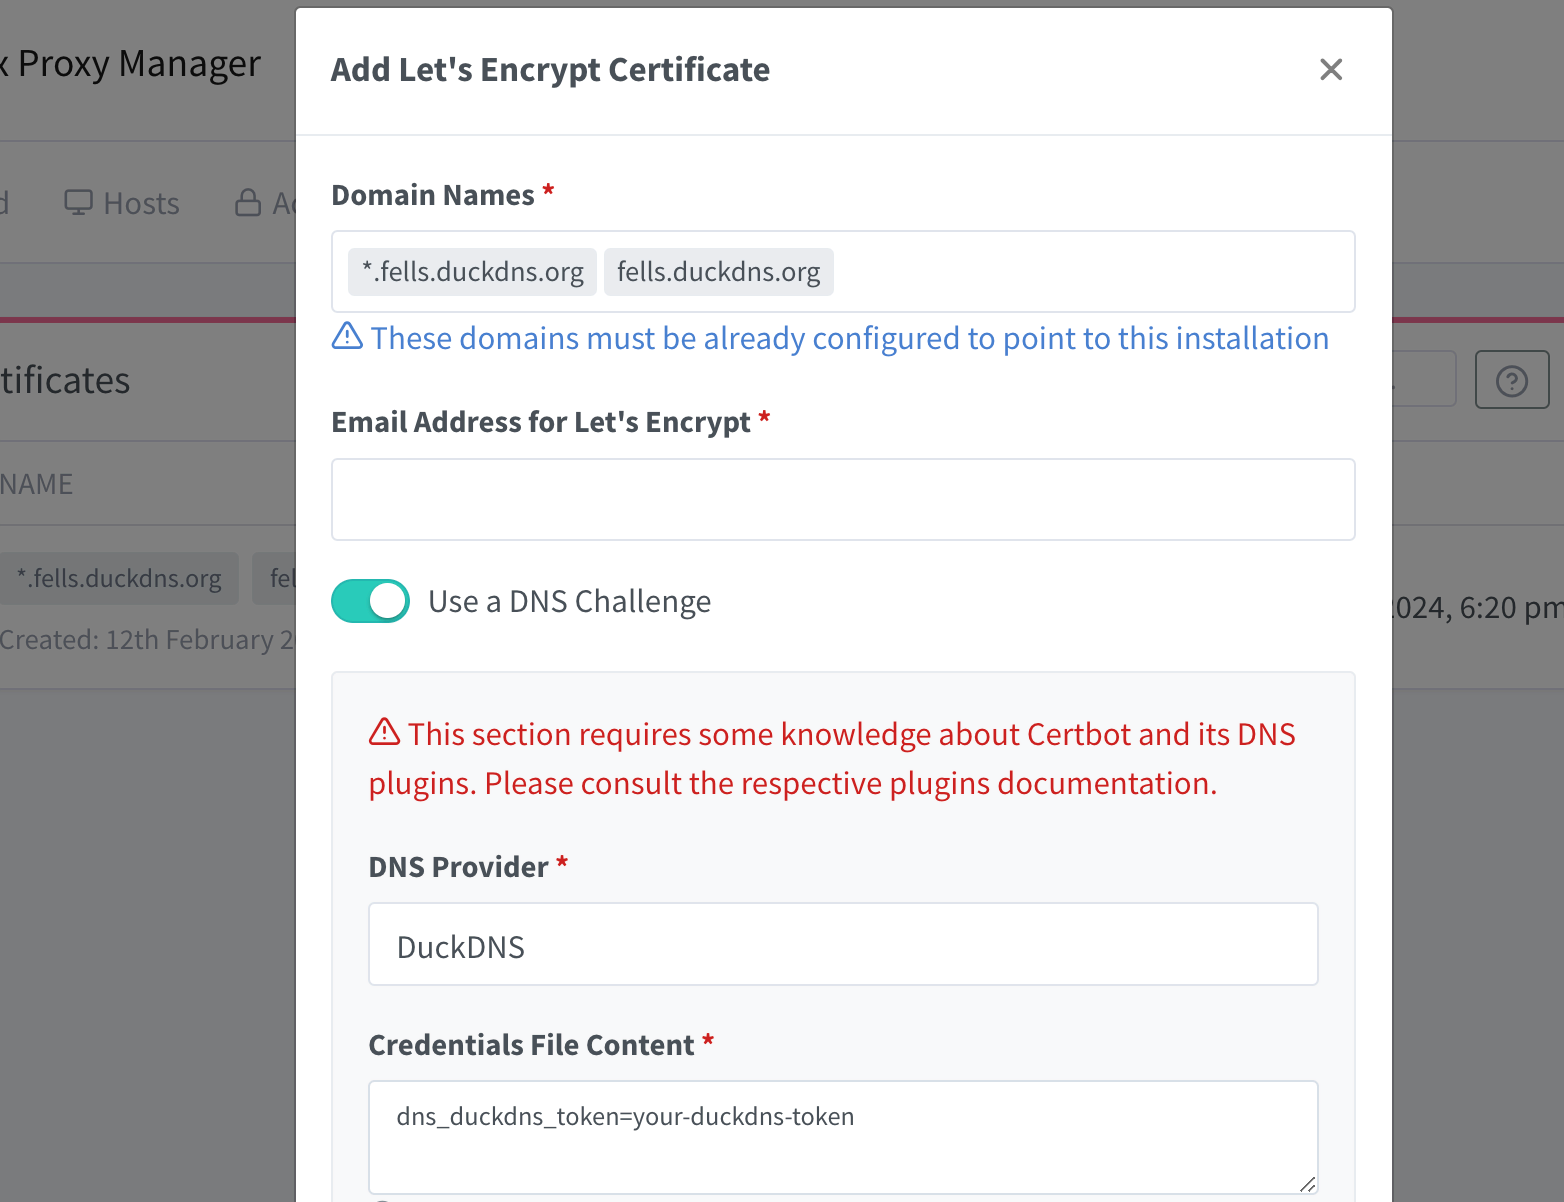
And lastly, for each proxy host configured, you can enable SSL and choose the domains for which the SSL certificate is valid.
Homer Dashboard
Is where everything comes together in a neatly organized dashboard. Homer provides quick access to all the applications I have installed. As such, it deserves the main domain name, fells.duckdns.org.
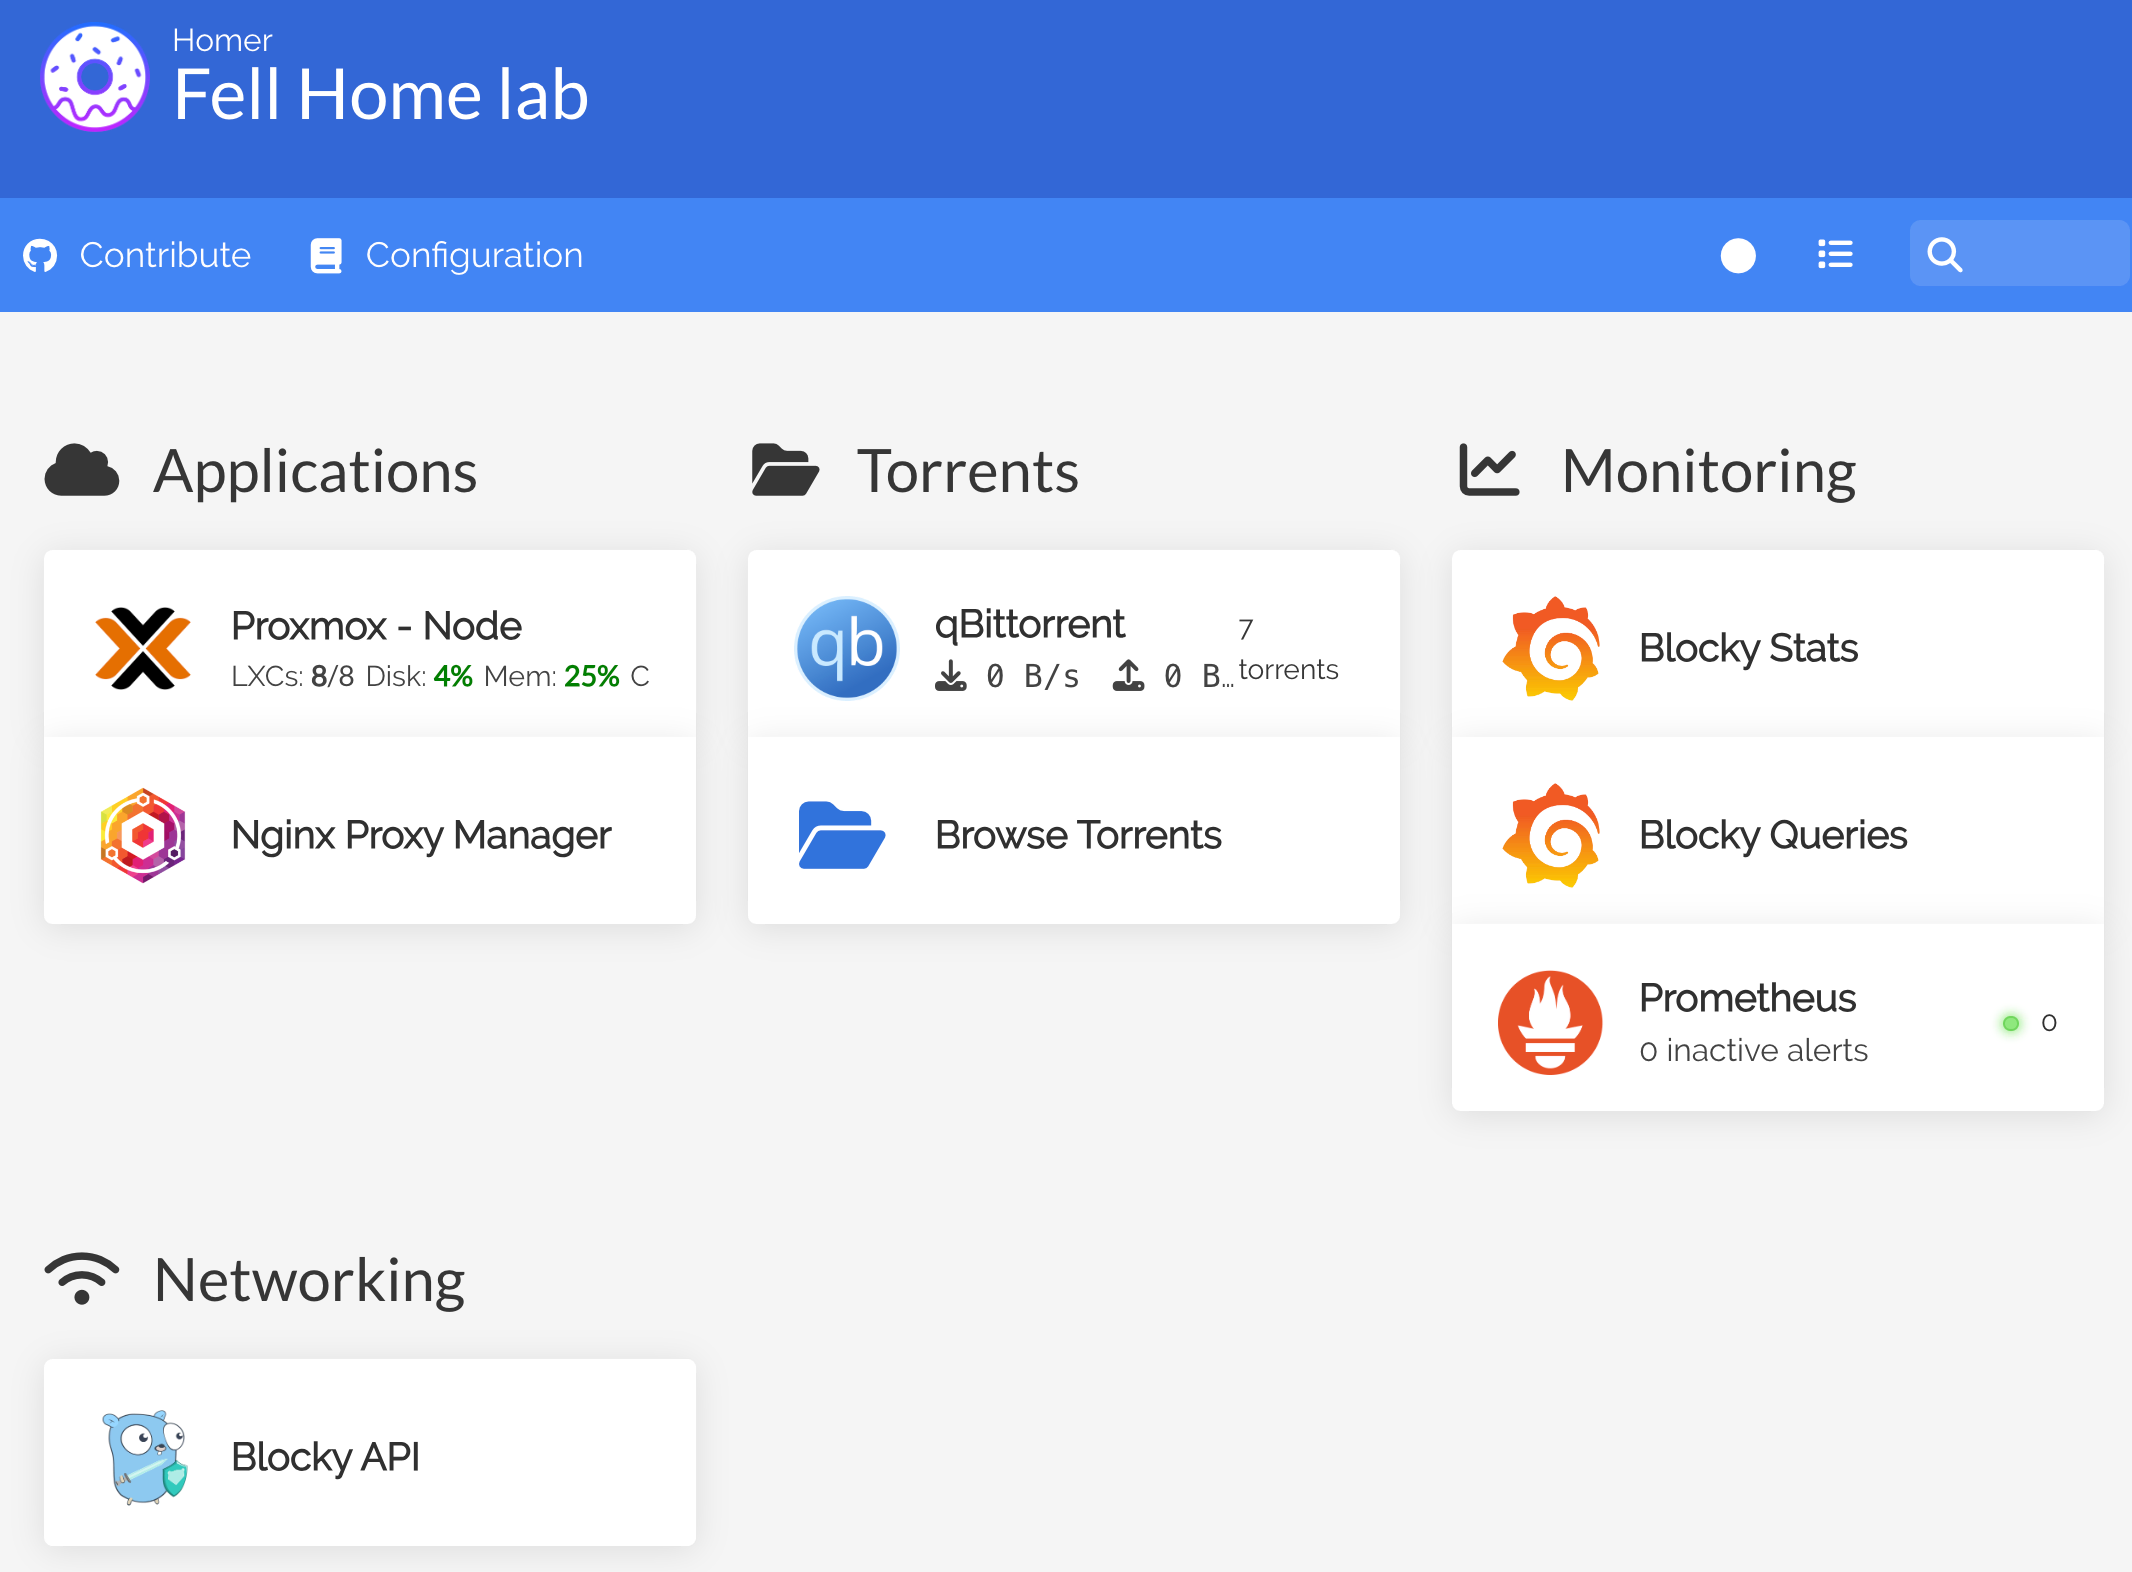
Everything is a click away. Each service is configurable through a .yaml configuration file, and some of them even have additional integration with Homer, like Proxmox, which shows the status of the virtual machines and containers and qBittorrent, which shows the download/upload speeds and the number of torrents.
Final Considerations
This is the state of the home server in the past week. The CPU usage hardly exceeds 10%, and the RAM usage is around 2GB. The server is idle most of the time, and while I can’t really monitor the power consumption yet, I’m happy with the low noise and low heat output.
In the left you can see all the Linux Containers I have installed. Each of them is basically a separate environment, that can be backed up, restored, and even moved to another Proxmox server.

I was thinking of adding a Bitcoin Node to this setup, but I’m unsure if the hardware will be able to handle it.
It is still crazy to me how many things I can run in this old computer. I’m also considering adding a UPS to the setup, for power monitoring and to gracefully shutdown in case of a power outage. But the smart ones are quite expensive.
All in all, this has been a great learning experience. It challenged my research skills, and I learned a lot about networking, DNS, SSL certificates, and virtualization. I’m excited to see what else I can do with this setup and future setups in a few years.
I hope this post can inspire someone to start their own home lab journey. It is a lot of fun and very rewarding.
Also posted on LinkedIn and HackerNews